The viral posts you’ve seen on LinkedIn didn’t go so popular purely by luck. Those posts are fruits of hard groundwork. And the base of that groundwork is to expand your network.
Imagine you have 5.000 active connections and relationships on LinkedIn. What will happen when you post content?
Likes, comments and shares will happen. This will boost your credibility and make you look like a thought-leader. And eventually it’ll help you to generate leads!
So in this blog post, we’ll make sure you’ll get enough people in your circle. To generate leads first you should know how to expand your LinkedIn network.
And if you can learn these three things, you’ll be able to expand your network while you’re sleeping.
- How to use LinkedIn Sales Navigator
- How-to operate a Boolean search
- How-to send automated connection requests and messages to people.
Let’s clarify why you need the LinkedIn Sales Navigator first then.
1. Why LinkedIn Sales Navigator
Because it’s the best option on the planet, every business person on the platform is one click away from you. And pretty much everybody uses LinkedIn.
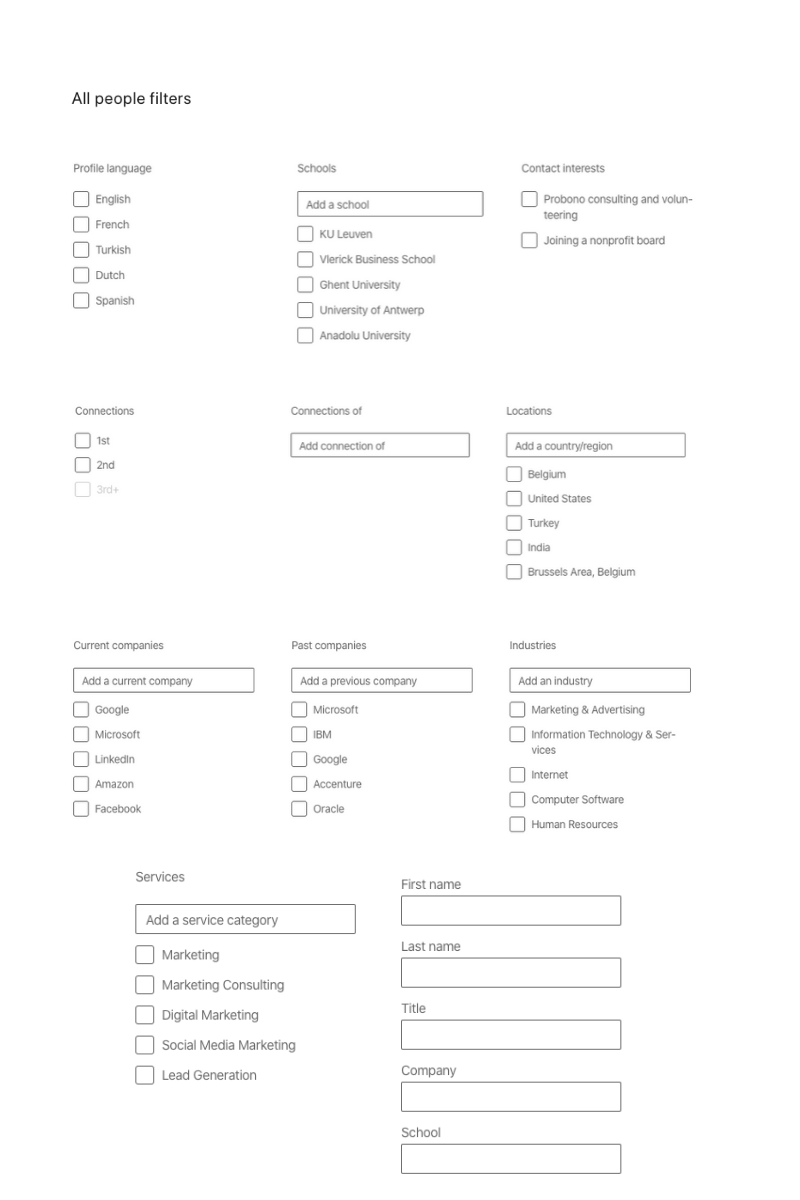
You have a regular LinkedIn search, but it looks like this.
Here are the search filters of the LinkedIn Sales Navigator.
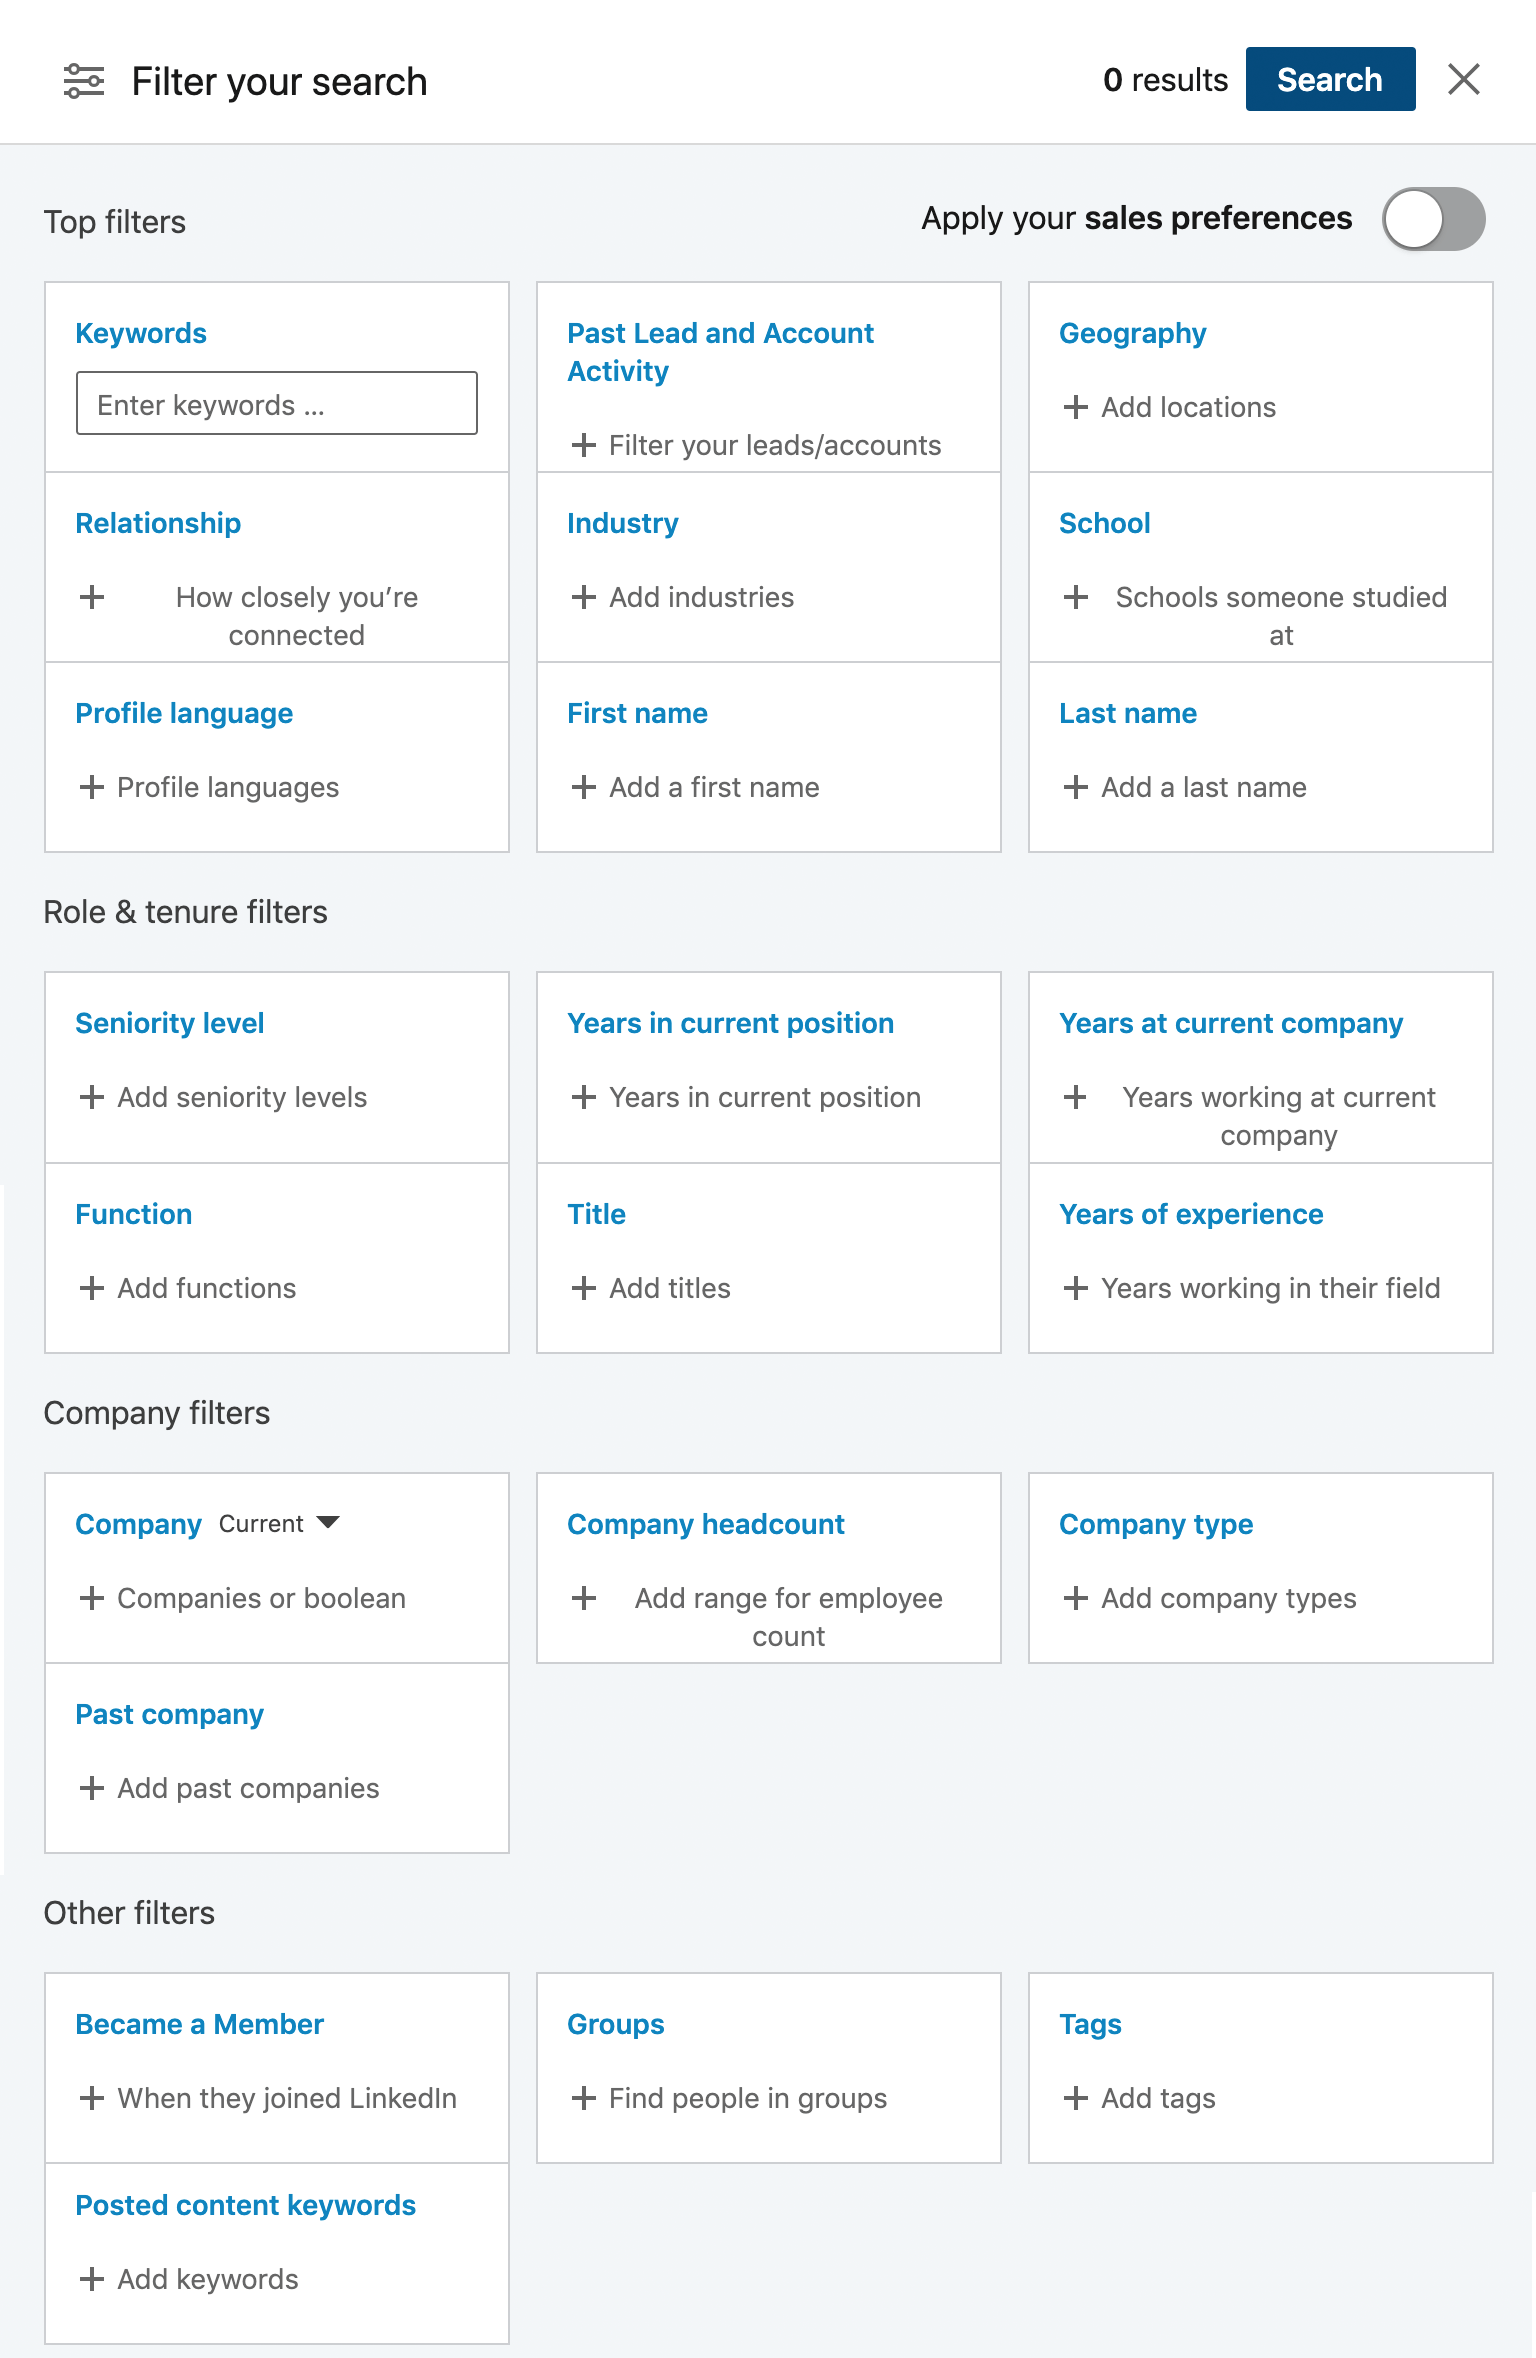
As you see, it’s absurd to compare these two. But of course, LinkedIn Sales Navigator is not free. The price tag is $79.99 but it’s totally worth it.
However, you don’t have to pay to apply this tutorial because LinkedIn offers a one-month free trial to every user. So you’ll be able to follow the rest.
If you know how to use it, you can snipe anyone with the LinkedIn Sales Navigator. And this is what you’ll learn with Boolean Search in the next steps.
But for now, let’s discover some features together.
Top 5 LinkedIn Sales Navigator features you should know
The goal of this chapter is to get you ready for the Navigator. It could look confusing if you see the interface for the first time.
So here, you’ll learn the essential features of the platform. Then when you go on your first date with the Navigator, you’ll have some things to do!
LinkedIn Sales Navigator feature #1: Get an overview and notifications for better prospecting.
You can save individual contacts or organizations in your pipeline. Then you’ll be able to see their activity in your Sales Navigator news feed.
You can stay up to date on any minor or significant changes in their life, role or organization. This can help you to create more opportunities and personalized approaches.
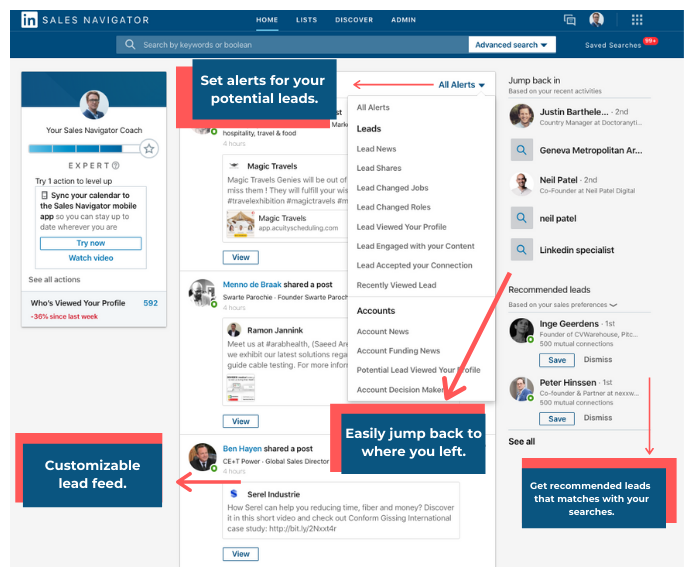
Also, you can jump back and continue from where you left. Or check recommended leads that LinkedIn suggests you and discover similar people.
LinkedIn Sales Navigator feature #2: Set alerts by type.
This can help you a lot to generate leads or hire new talents.
For example,
You can set an alert by job type and Sales Navigator will notify you if one of your leads changes their job status. This can provide you new angles to start a conversation.
LinkedIn Sales Navigator feature #3: Save searches to save time.
You filtered and figured out your target audience for the next campaign. Well, you’ll want to save it, right? It’s a dull job to do it over and over again.
LinkedIn Sales Navigator lets you save up to 15 searches. Also, it tracks when new prospects add up to the saved criteria. Then it notifies you daily, weekly or monthly.
It’s like you have a perfect VA, which saves you time and makes money.

LinkedIn Sales Navigator feature #4: Use spotlight filters to narrow down your search.
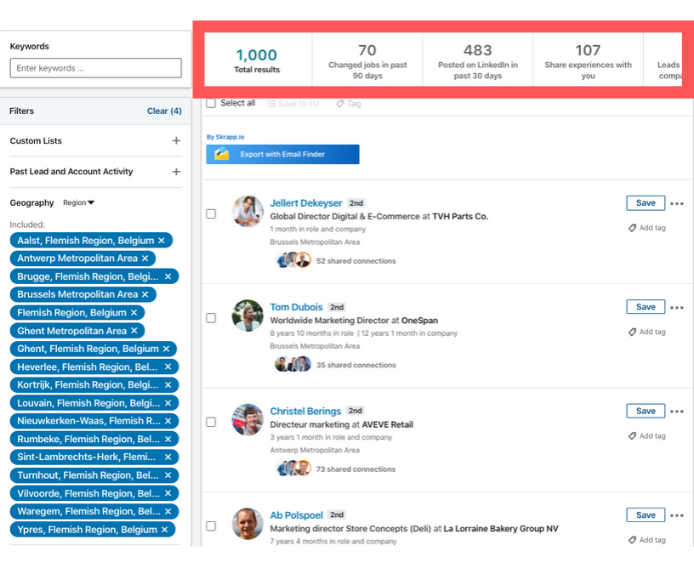
What you can do with this feature is up to your imagination. As you see in the picture, we have 1.000 people.
Let’s say you have limited time and resources.
483 of them posted on LinkedIn in the past 30 days. So we know they’re active on the platform and more reachable. Then it would be smart if you prioritize that 483 people first.
or
107 shares similar experiences with you, that’s also interesting. Maybe you can analyze their profile and create a personalized approach. All this filters can help you to expand your LinkedIn network more efficiently.
LinkedIn Sales Navigator feature #5: Filters that could even help you to find a kidnapped CEO
This is the main reason that you would use LinkedIn Sales Navigator. There are 24 filters available at the moment. They’re all very specific and have different usages.
And LinkedIn is trying to improve its filters all the time. So you can expect more in the future.
We frequently use:
- Company Headcount
- Seniority level
- Function
- Title
- Years in current position
- Years at current company
- Posted content keywords
- Posted content in the last 30 days
But there is a more powerful way to pinpoint anyone you want to find. It’s a Boolean search. If you can combine Boolean and these features, you can get outstanding results.
And we want you to get outstanding results. Because of that, you’ll learn how to use the Boolean search in the next paragraphs.
2. Boolean search LinkedIn: A quick guide to pinpoint your target audience.
Let’s demystify the Boolean search first.
In a nutshell, it’s a structured search process that uses keywords or operators to limit, broaden or define the search results.
Search string modifiers or operators defined by:
- OR
- AND
- NOT
- “” – Quotation Marks
- ( ) – Parenthesis
By using these five elements, you can pinpoint your buyers, influencers or new talents.
Now let’s see what the functions of the modifiers are. And how you can use them. We’ll use the terms copywriter, art director and creative director in our examples.
Boolean operator #1: OR – Copywriter OR Creative Director
Use OR (capital letters) to see results that include one or more items in a list. In most cases, the usage of OR is to broaden your search results.
This search will bring the people that listed themselves with both titles.

Boolean operator #2: AND – Copywriter AND Art director
Use AND (all capital) to filter results that include all items in a list. Meaning you’ll see the people who fall in the cross-section of the Venn diagram.
If you add more ADD operators to your search, you’ll end up with fewer people. But your search will be more relevant because you want both skills in one pack.

Boolean operator #3: NOT- Copywriter NOT Content Writer
Now, you ask the database to bring you only copywriters and exclude all Content writers. This will help you to remove similar but irrelevant results.

Boolean operator #4: Parenthesis ():
Parenthesis are essential for writing complex search strings. By using them, you tell the database to solve what to solve first.
An element within the brackets is given priority over other elements around it.
“Creative Director OR Copywriter AND Art Director”
What is happening in this search?
Do you want to find someone who has either the keyword “Creative Director” or the keyword “Copywriter”? Also has the keyword “Art Director’ too?
Or do you mean the result has to have “Creative Director” or the combination of “Copywriter” and “Art director”?
You see, without parenthesis, the database couldn’t predict your intention.
Look at this:
(Copywriter OR Creative Director) AND Art Director
Here you requested that you want to find someone who has a “Copywriter” or a combination of “Creative Director” and “Art Director.”
Copywriter OR (Creative Director AND Art Director)
Now the results will change because parenthesis enclosed a different set of words.
Boolean operator #5: Quotations “”
Quotation marks can help you to get specific.
Let’s take a look at the difference between “Creative Director” and Creative Director
When you type Creative director, the database will fill the space between two words with ‘AND’.
As a result, strings will bring you the people who have creative director, creative and director keywords on their profile.
If you want your term to be recognized as a whole, then you have to enclose it with quotation marks. This way, the database will bring you the exact phrase “Creative Director”.
An example of a Boolean search
We’ll use Boolean for a very niche query to show you how effective it is.
You have a new medical product. You’re looking for a new freelance medical sales copywriter that can help you with a landing page.
Let’s check what pops up when you write the term on LinkedIn Sales Navigator.
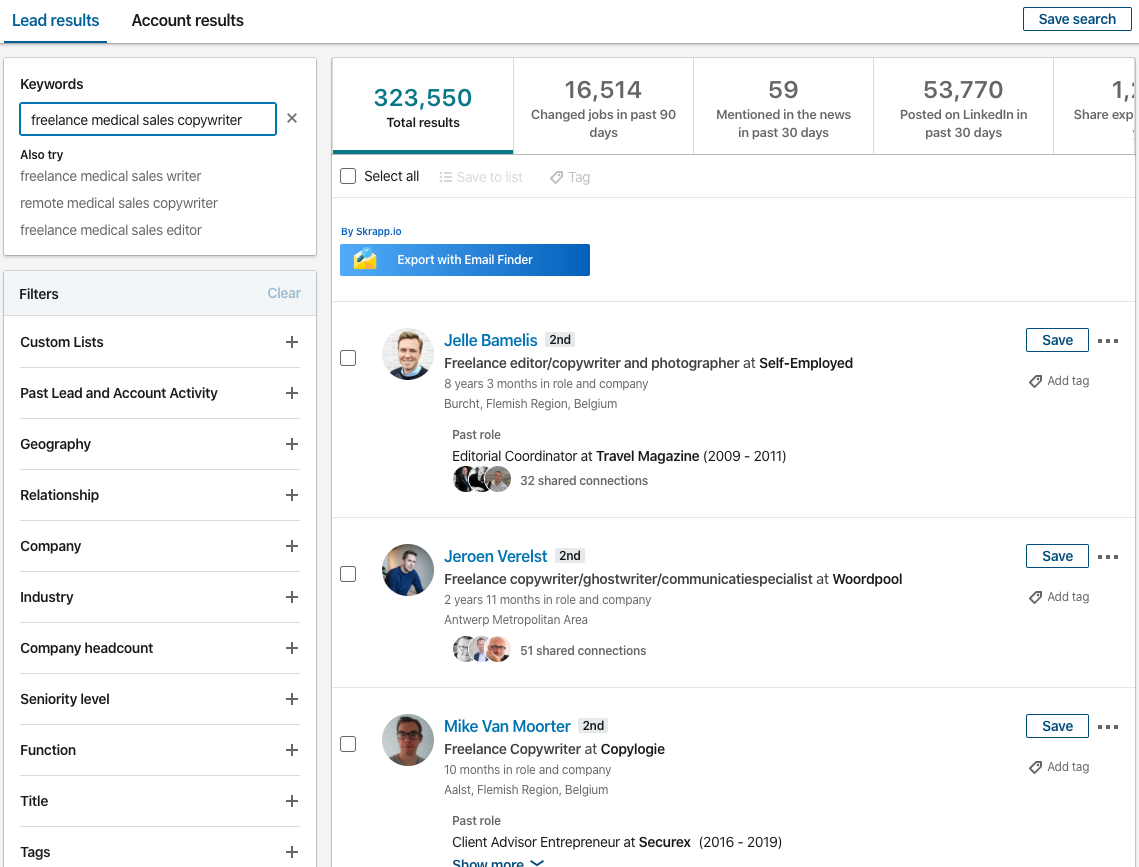
It’s not accurate at all. The results are too broad and now you need to filter it or skim the list manually.
Well, let’s try it with Boolean search, see if we can bring better results.
The exact search query is: freelance AND medical AND sales AND copywriter.
I used AND because I want to narrow down my options and need all qualifications together.
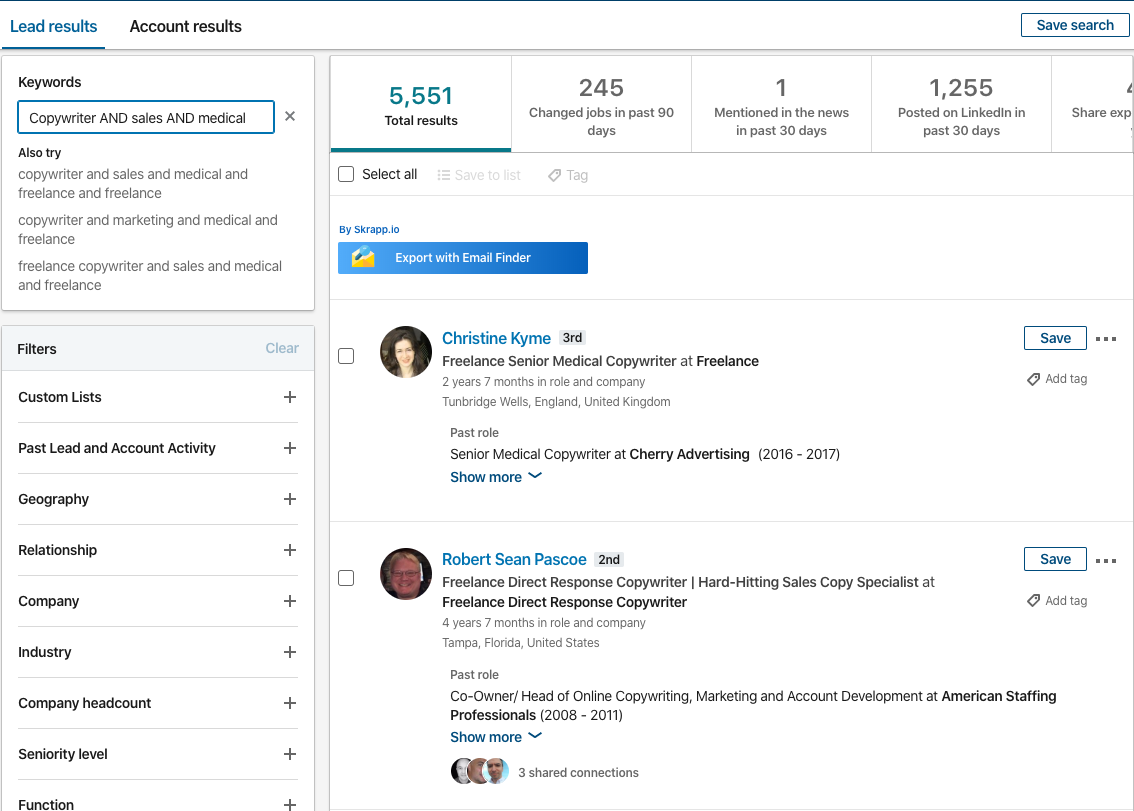
Here we ended up with 5,411 results. And as you see from the first two candidates, it’s pretty on point.
You see, the Boolean search will help you to find your target audience very fast. But what will you do after you find your target audience?
It’ll be useful if you could add them and start a conversation. But it can be painful to add thousands of people and send them messages manually.
This is why you’ll learn how to automate this dull process now. And how to expand your network on LinkedIn on autopilot.
3. How to expand your LinkedIn network on autopilot with Phantombuster
It’s time to show you some interesting stuff. Phantombuster is our favorite growth marketing tool by far.
You have a 14-day free trial. You can do all these experiments in 14 days and if it’s worth it, decide to buy it later
In theory, it’s free forever. Because you can start another trial with a different mail. But your saved progress (phantoms) will be lost and it’s very important not to lose them.
What can Phantombuster do?
It can scrape data from LinkedIn and a bunch of other platforms. It can help you to add automatically, message, like, follow, even extract emails and more.
But at this stage, the goal is to add your potential customers and likeminded people to your network.
So, here you’ll learn how to message and add all the people from your LinkedIn Search Navigator result.
And you’ll get there in three steps of automation.
- Extract the data from your LinkedIn Search Navigator results
- Scrape all the profiles and enrich the data you extract.
- Send automated connection requests and messages to your audience.
I know all those words SCRAPE, EXTRACT and DATA might look scary to you. But it’s a child’s play. Because with Phantombuster, you don’t need to know anything but reading.
Plus, we’ll show you how to step by step with images. So let’s find out how you can do all this awesome stuff.
Overview: You’ll use these three features in the Phantombuster’s toolbox. In order of,
Linkedin Sales Navigator Search Export > LinkedIn Sales Navigator Profile Scraper > LinkedIn Network Booster
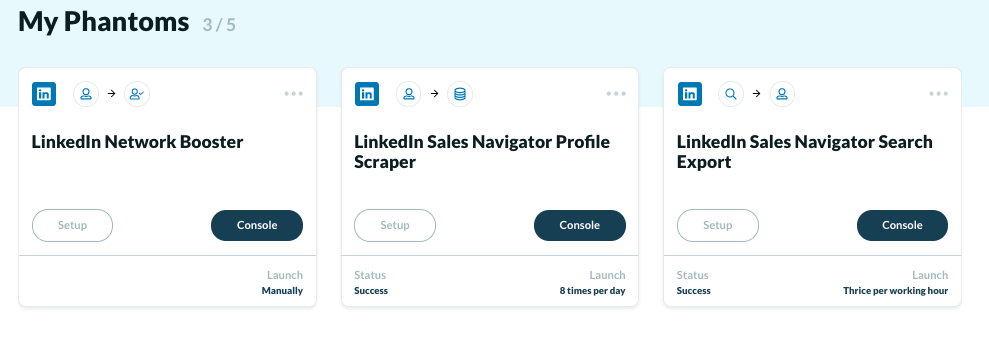
In this scenario, we’ll be a SaaS product that has SEO solutions for Content Creators. We know that “Head of Content” knows the problem well. And she can have the power to influence decision-makers
Or she’s already a decision-maker.
How to expand your LinkedIn network step #1: Extract your target audience data from the LinkedIn Search Navigator
You need to know who your target audience is to reach the right people. Here (according to the scenario) your goal is clear. You’ll find the “Head of Content” people in Belgium.
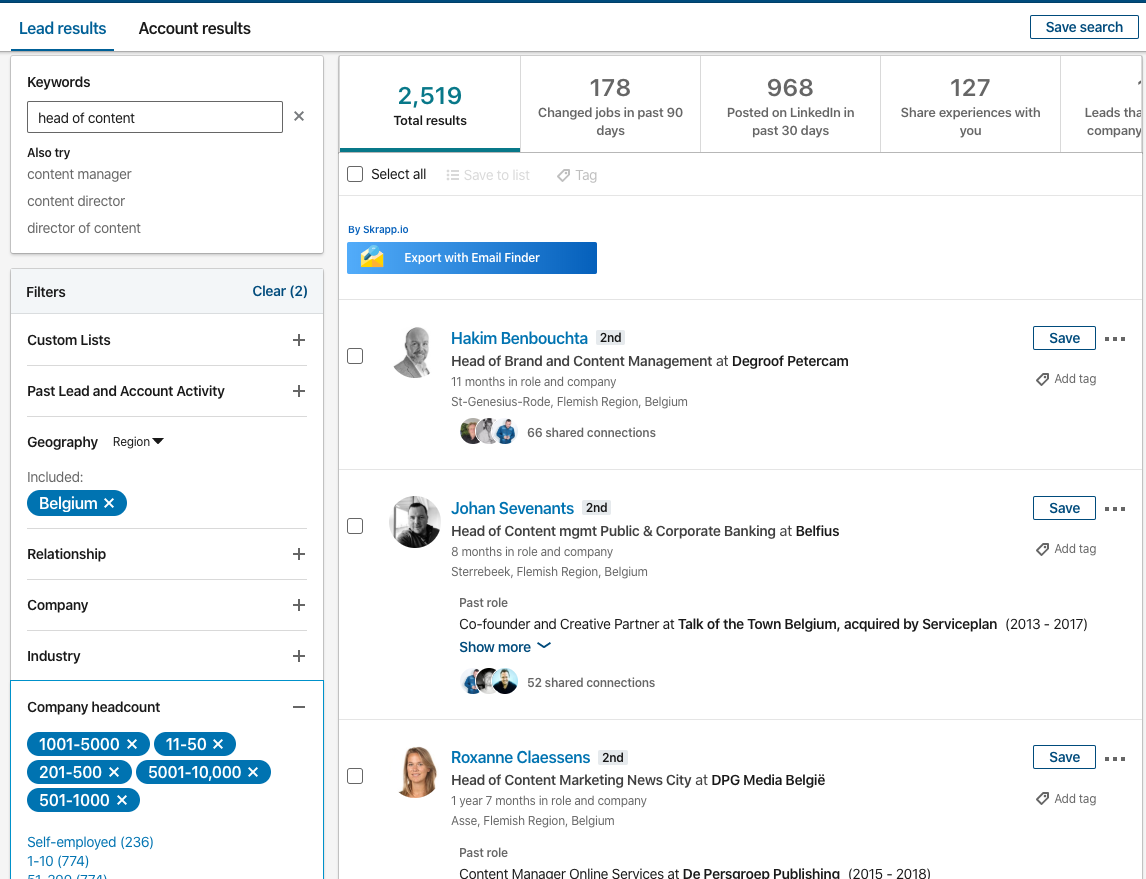
After you played with filters, there are 2,519 people left. Now we’ll export their data with Phantombuster. You’ll use the LinkedIn Sales Navigator Search Export phantom for that.
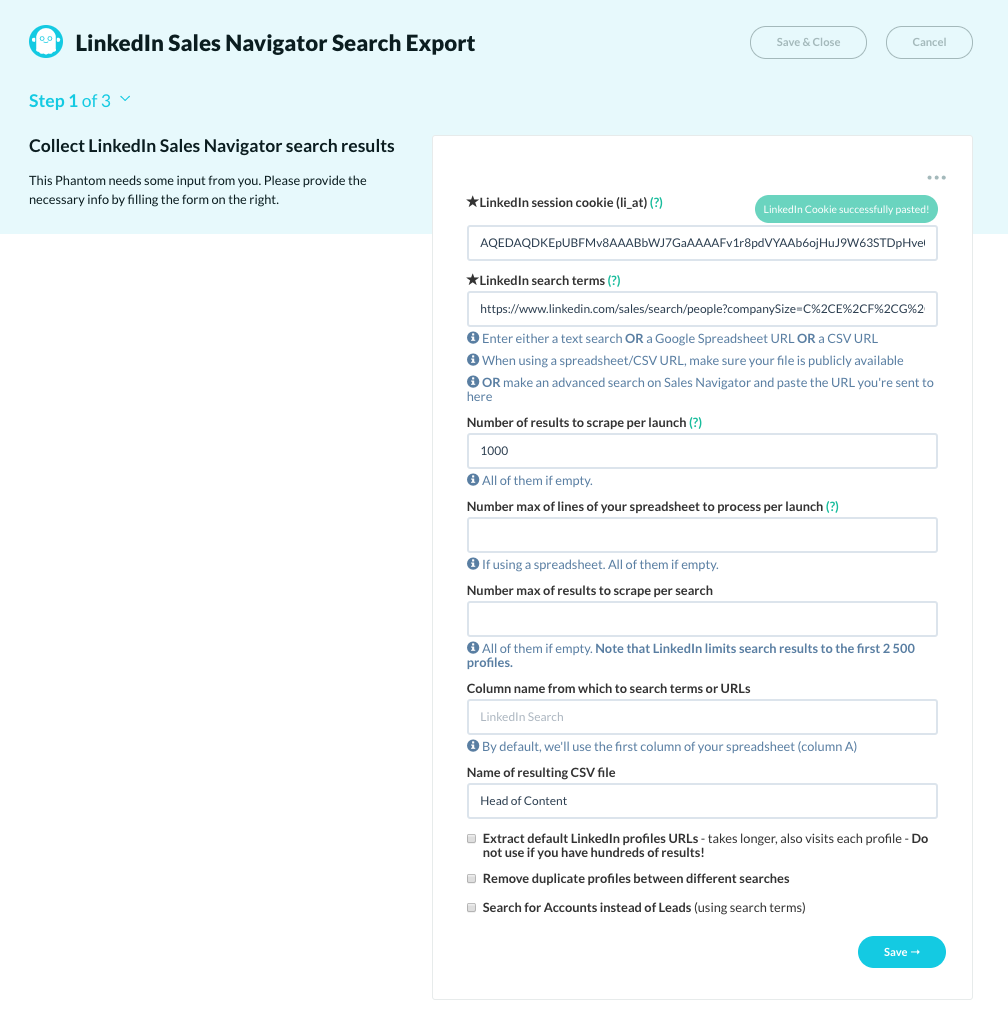
On this screen, you need to fill four spaces.
LinkedIn session cookie: If you press the button (Get Cookie from LinkedIn), Phantombuster will direct you to a Chrome add-on.
Download it. It’s 100% safe and this way you can fill the first space automatically.
LinkedIn search terms: Here, you’ll paste the page URL of your LinkedIn Sales Navigator Search Result. That’s it.
Numbers of results to scrape per launch: Here, you’ll decide how many people you want to extract per launch. Don’t go over 1000 people at once.
If you do, LinkedIn can flag it as suspicious activity and they can suspend your account. Read the guidelines of Phantombuster here by clicking the question mark.
But if you stay below 1000 nobody will get hurt.
Name of resulting CSV file: Name your file. In this case, it’s “Head of Content”.
After you pressed the save button, you’ll see this screen next.
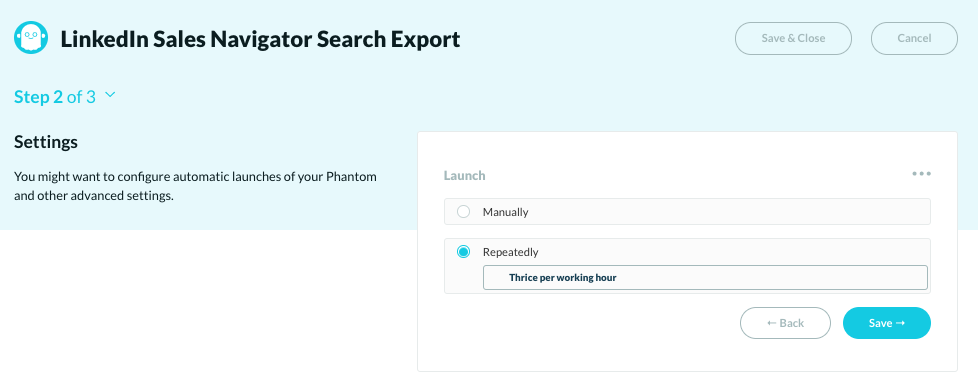
If your search result goes beyond 1000, you have to choose repeatedly to avoid the manual process.
Here you have over 2,500 profiles to export. So, you’ll choose thrice per working hour to get them all (3×1000=3000).
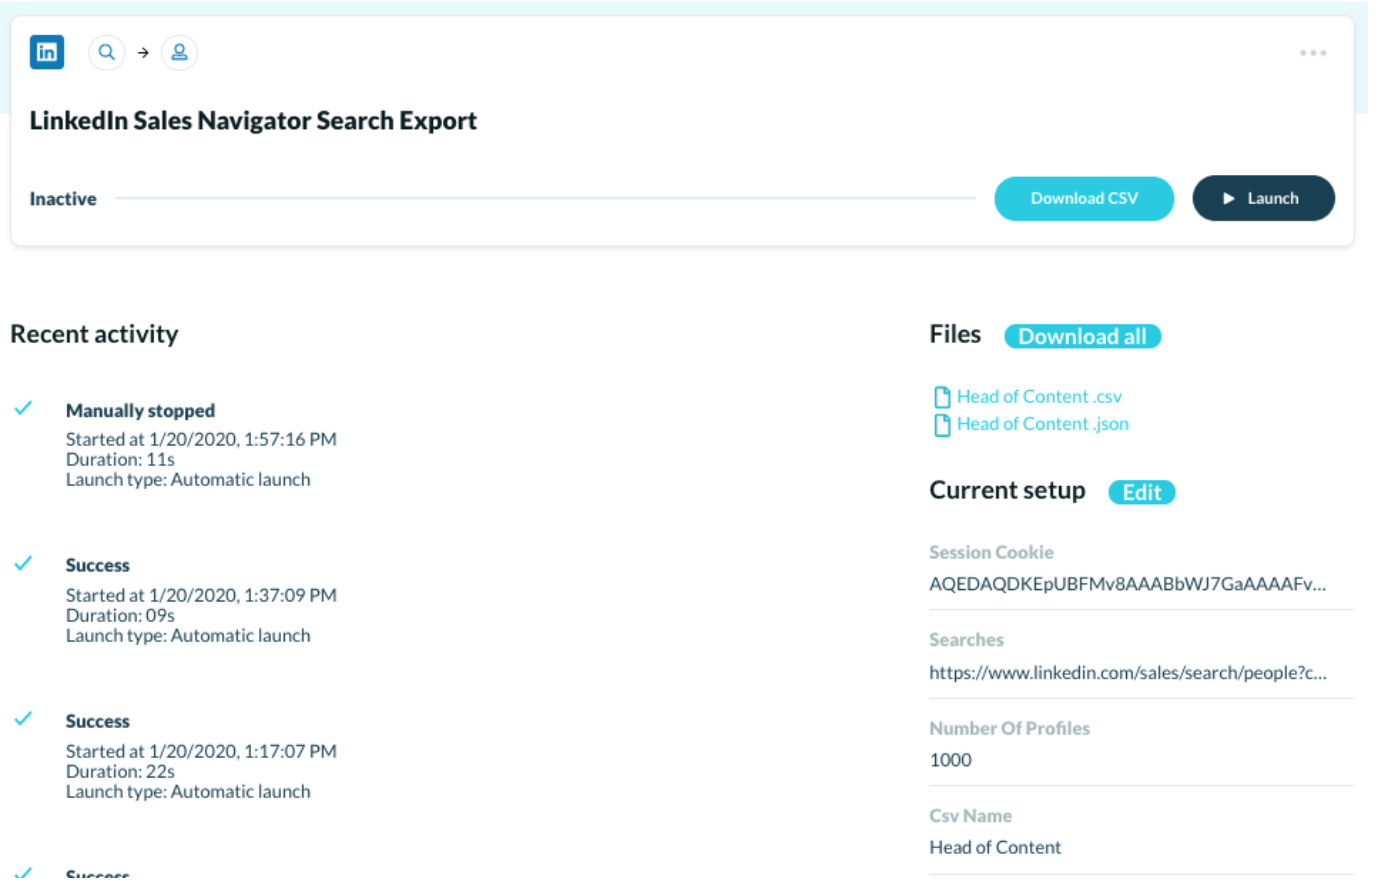
How to expand your LinkedIn network step #2: Scrape all the profiles and enrich the data you extracted.
First, you have to enrich the data you have from the first export. Because you still don’t have their personal LinkedIn Profile URLs. You just scraped their LinkedIn Sales Navigator profile URL’s.
Since your goal is to message and add people, you need their profile URLs first. Here you’ll use LinkedIn Sales Navigator Search Scraper to scrape that URLs
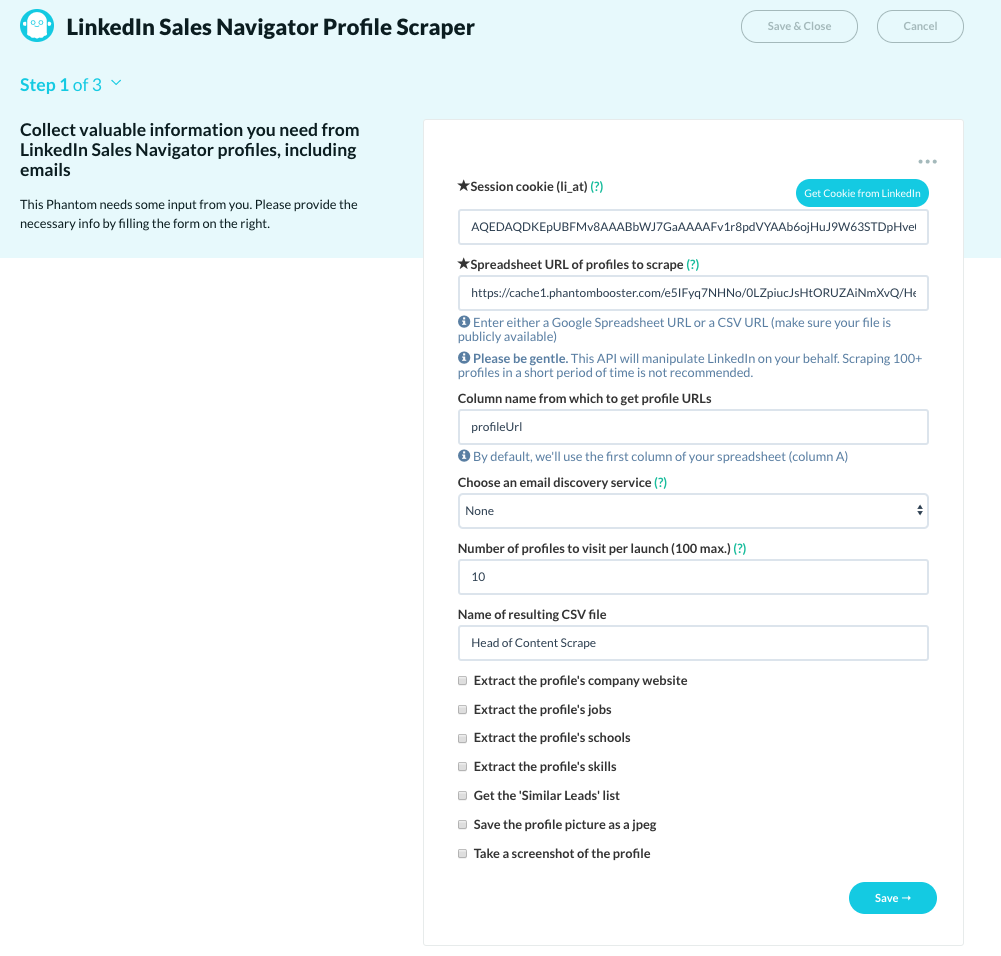
You already know about session cookies.
Now for the Spreadsheet URL of profiles to scrape, you have two options.
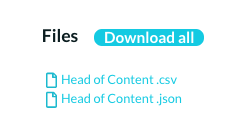
Option 1: Download the .CSV file from the first export result.
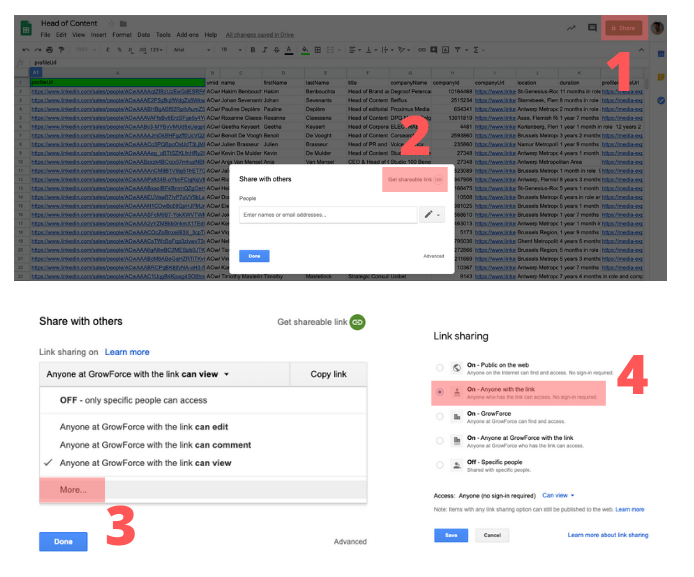
Create an excel doc in your Google Drive and paste .CSV into that doc. Then open your spreadsheet publicly available. If you don’t know how, you can follow these steps.
After you make your file public, copy the URL of your spreadsheet and paste it to the Spreadsheet URL field.
Option 2: Copy the link address to get updated results from the LinkedIn Sales Navigator Search Export.
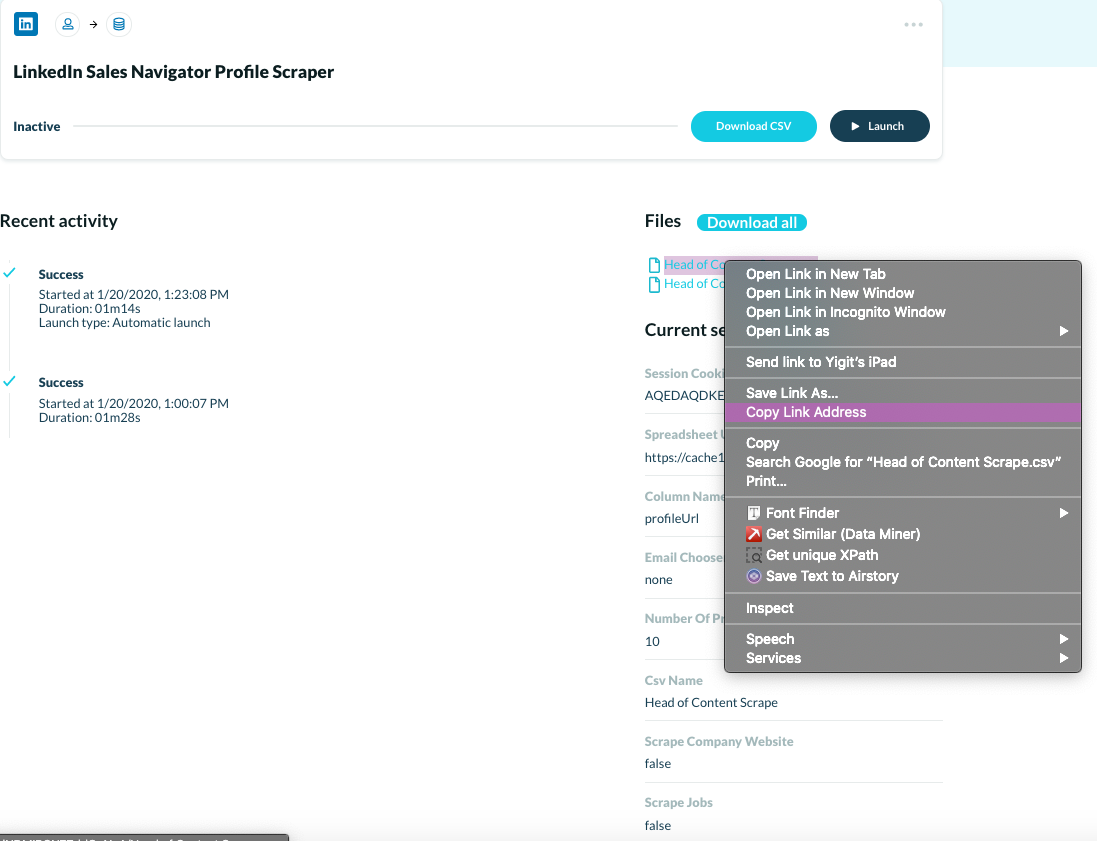
Then paste it to the same “Spreadsheet URL of profiles to scrape” field.
You may say, “why this option?”
Well, if you are exporting in bigger volumes STEP 1 , you’ll have to wait for hours to get your final .CSV file.
By copying the link address, you can start with STEP 2 at the same time. You don’t have to wait for your final .CSV file. Because this link will add up the data and update itself.
Column name from which to get profile URLs:
Here you need to tell Phantombuster to which column it should grab from the spreadsheet. In this case, Phantombuster needs to grab profileUrl.

The number of profiles to visit per launch: Don’t scrape more than 100 profiles per session here. Anything above 100 is dangerous. Then, of course, name your file if you want.
As you see, there are several boxes above the save button. If you want to enrich your data with extra features, don’t hesitate to tick them.
After you hit the save button, you’ll see this screen.
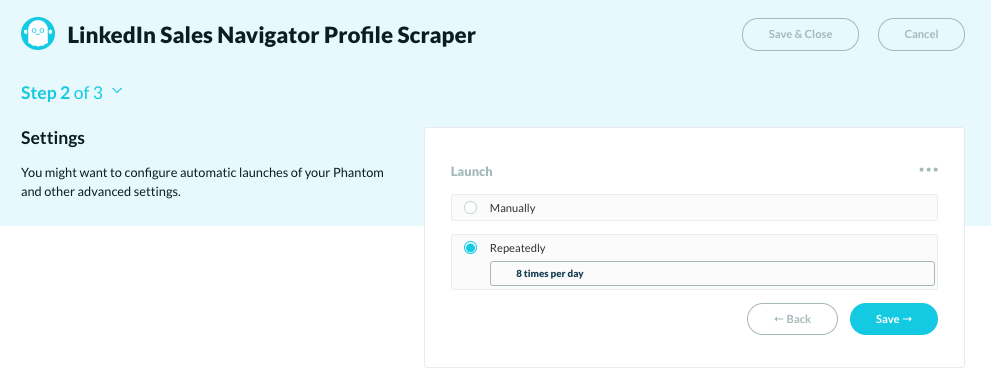
How to expand your LinkedIn network step #3: Send automated connection requests and messages to your audience.
This is the last step of our little automation chain. You’ll use the LinkedIn Network Booster phantom here.
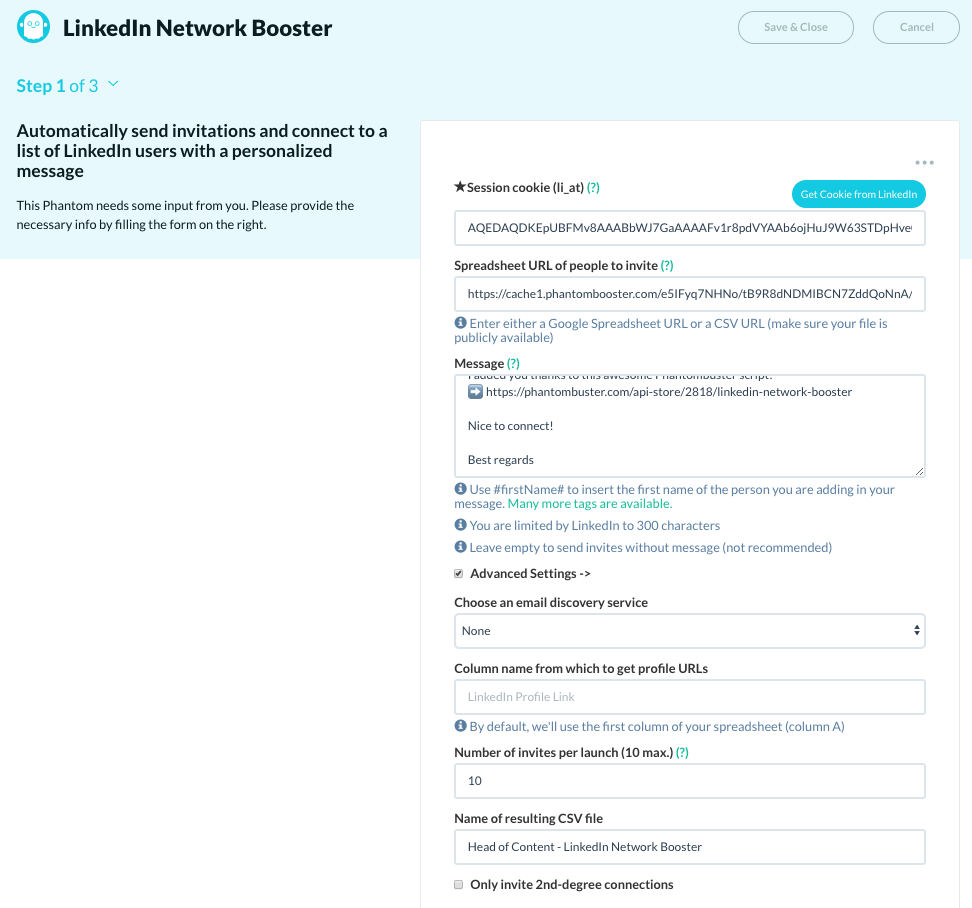
For the Spreadsheet URL of people to invite: Here we’ll use the copy link address strategy.
Because you can scrape 80 people in a day.
That means you can scrape 2.500 people in 31 days.
So it’s best to let the list update itself every day. So you can add and send messages to incoming waves — all automated.
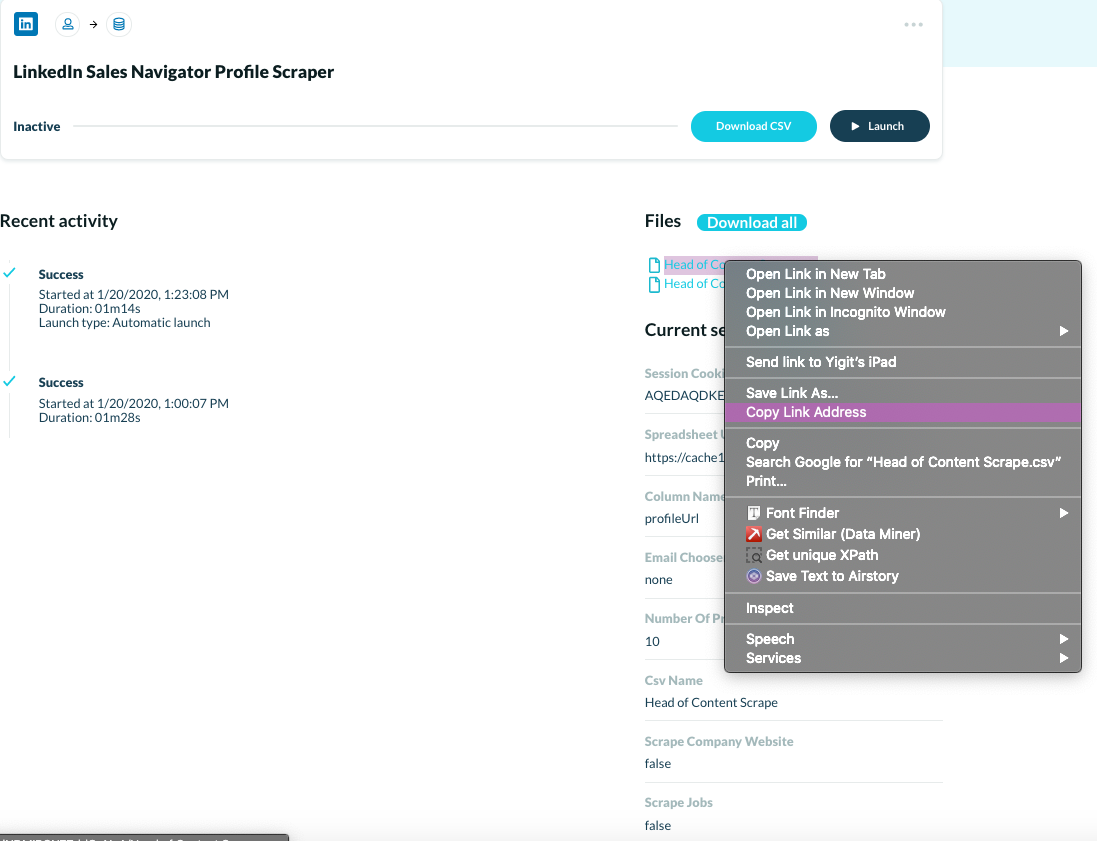
Copy the link address and paste it in this field.
Personalized message:
You can send a personalized automated message with your connection request. If you can write a good one, it can increase your acceptance rate.
With Phantombuster, you have lots of options for personalization. You can customize your message by using #firstName#, #fullName#, #company#, #jobTitle#, and #school#.
Make sure your message is under 300 characters. (Custom fields included)
Here you can send various messages that carry different intentions. One thing for sure, don’t try to sell or push anything at first sight.
Here are a few eye-openers to inspire you.
Some example messages to expand your LinkedIn network
Honest message (considering “head of content” as the target):
This is a straight forward message about your intention. People usually accept this kind of invitation because you’re not trying to sell anything to them.
Hey #firstName#,
I hope you’re having a great day.
I’m trying to learn more about content marketing and expand my LinkedIn network. Right now, I’m looking for smart and like-minded people on LinkedIn to follow, learn from and exchange ideas.
I thought it would be great to be your connection,
A bit salesy but not too pushy.
This message is pretty personal and honest. Here you ask for their permission to send them a free trial, blog post or whatever the desired goal is.
Hey #firstName#,
Sorry to message you out of the blue. I have this idea that solves X problem for content marketers. I’m trying to connect some like-minded people to talk and get feedback.
Would love to know what you think of the idea. Please let me know if you’re interested.
Promise valuable content for them
Hey #firstName#,
I’m trying to be more active on LinkedIn and connect with like-minded people. I’m planning to share unique content about “X” every week. As a content marketer, I thought you could find some value in them.
Would you like to stay in touch and exchange ideas?
Onwards to advanced settings.
Column name from which to get profile URLs: You’ll take this from your scrape .CSV file. In this case, it is linkedinProfileUrl

The number of invites per launch: 10 is the maximum number of people you can add per session. You already know why from STEP 2.
Name your file and hit the save button.
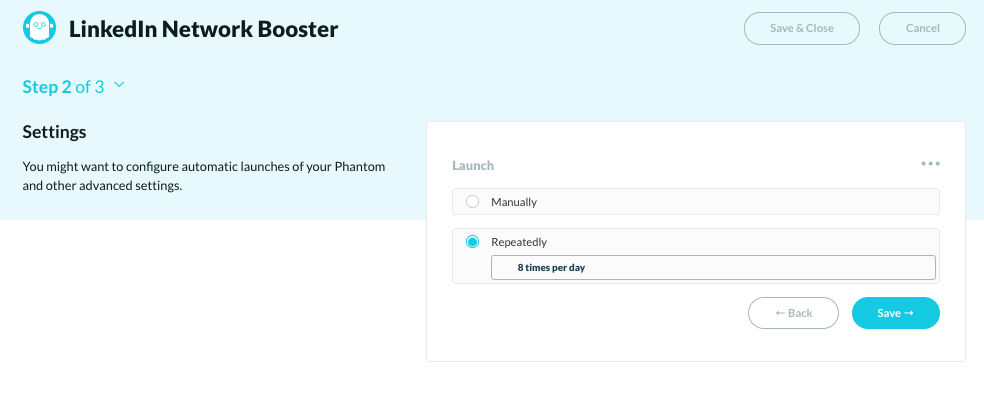
Choose 8 times per day.
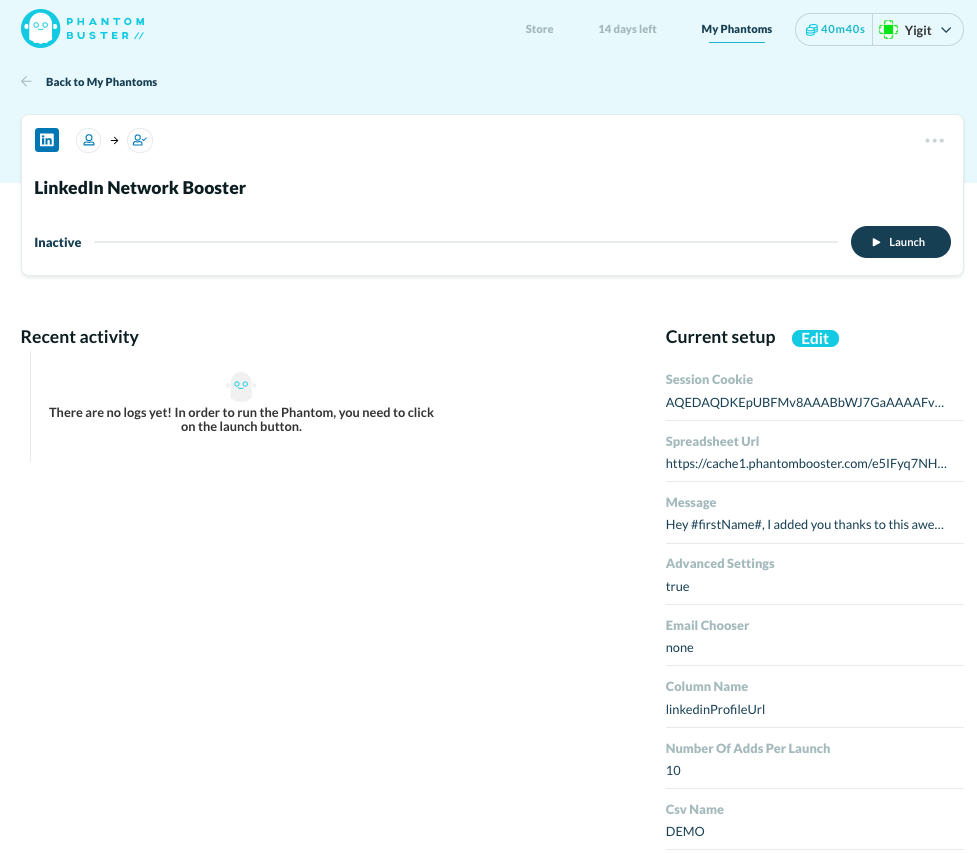
Press LAUNCH and YOU DID IT. You growth hacked your way on LinkedIn.
From now on Phantombuster will add and send messages to 80 people daily. All on autopilot!
Now you’ll start to make new friends and spark new conversations on LinkedIn. And this will help you to increase your engagement and eventually generate more leads.
Now you know how to expand your LinkedIn network on autopilot!
I hope you got some valuable insights and hacks from this.
Everything starts with your network. Before you start any lead generation efforts first do this. Surround yourself with like-minded people and possible prospects.
Then it’ll be easy to get likes, comments and eventually customers from the content your share.
Or the campaigns you ran!
Please share this post with a like-minded friend if you learned something.
Keep rocking on LinkedIn, see you around!

Yigit
Head of Content
I’m here to make sure you enjoy every bit of content you read.


Great content! Super high-quality! Keep it up! 🙂
Thanks! I hope you enjoyed it.